
Table of Contents
Whether you’re a beginner or a seasoned expert – if you climb you need to know your ropes. There are four essential rock climbing knots you definitely need to learn. Whenever I introduce friends and family to climbing a big part of is just showing them how to tie solid and safe knots.
You should learn a double Figure 8 Loop Knot to tie in, a clove hitch to secure the rope to the carabiner, the double fisherman’s knot to make two ropes into a loop and the European death knot to tie two ropes together.
I’m not to say there aren’t more, but these ones you need to know 100%.
You are literally hanging by the ropes and knots you ty, especially if you start lead climbing and build top-rope anchors for the following climbers, so make sure to practice knots.
Keep in mind that when it comes to climbing, there are numerous ways of tying knots, hitches and bend. Learning them all is impossible, and what I show you is just my way of highlighting the details.
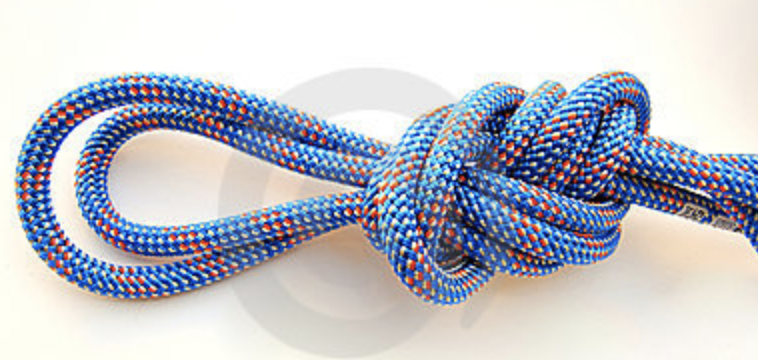
1. The Figure 8 Loop Knot
The Figure 8 Loop knot is one of the most popular knots used in climbing and is mainly used for tying the rope into a harness. It’s also known as double Figure 8 Knot. The knot resembles the number 8 and is relatively easy to tie and also has clear symmetry. The instructions are as follows:
- Take the open end of the rope in one hand, and then extend your arm along with the rope. The length of the rope to be taken should be between your fist and the opposite shoulder.
- Take a bight from the rope near the shoulder area and then twist it for a full rotation, allowing the stationary part of the rope to cross the working part. After which, perform the same rotation again so that it is back to its original position.
- Now the working part of the rope should be passed through the loop from the front to the back, after which the knot will resemble the number 8.
- For the follow through, the end of the rope should be passed through the tie-in points of the harness, and then the knot should be pulled close to you.
- The next step is feeding the rope through the knot, by tracing the original knot. While doing this the working part of the rope should be parallel with the standing part of the knot.
- After completing this see to it that the strands of the rope are neat and they are in parallel.
- The last step involves tightening the strands individually by pulling it. One thing to keep in mind is to keep at least five inches of tail.
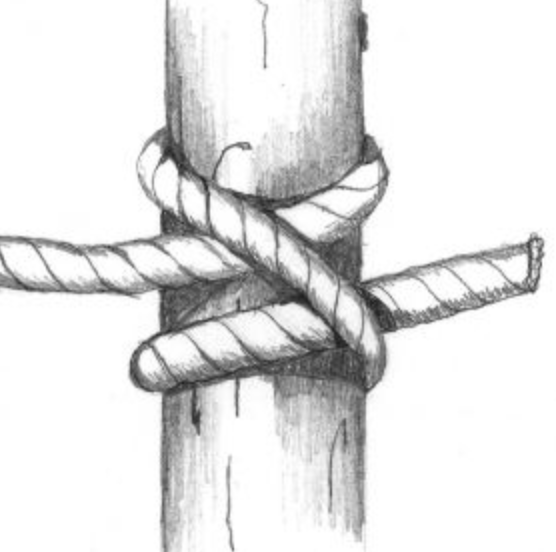
2. The Clove Hitch
This Clove Hitch is mainly for securing the rope to a carabineer and is a very simple yet strong knot. This knot can be tied within a matter of seconds, and adjusting it is also very easy. One unique thing about the Clove Hitch is that it can be tied using one hand only. Let us look at how to tie a Clove Hitch.
- Form a loop by holding the rope in both hands and then crossing it over, and then form a second one similarly.
- The next step involves placing the second loop behind the first one and then clipping them with a carabineer.
- The Hitch can then be dressed by pulling both the strands tightly.
To tie the clove hitch, with one hand to a carabineer, the instruction is as follows.
- Hold the rope in your fist with your fingers directed down the rope.
- And then bring your hands up allowing your fingers to point upwards facing you.
- The next step involves clipping the rope to the carabineer.
- For the rope which is below the carbineer, the same method should be applied and then clipped to the carabineer.
- The final stage is to dressing Clove hitch by pulling the strands tightly.
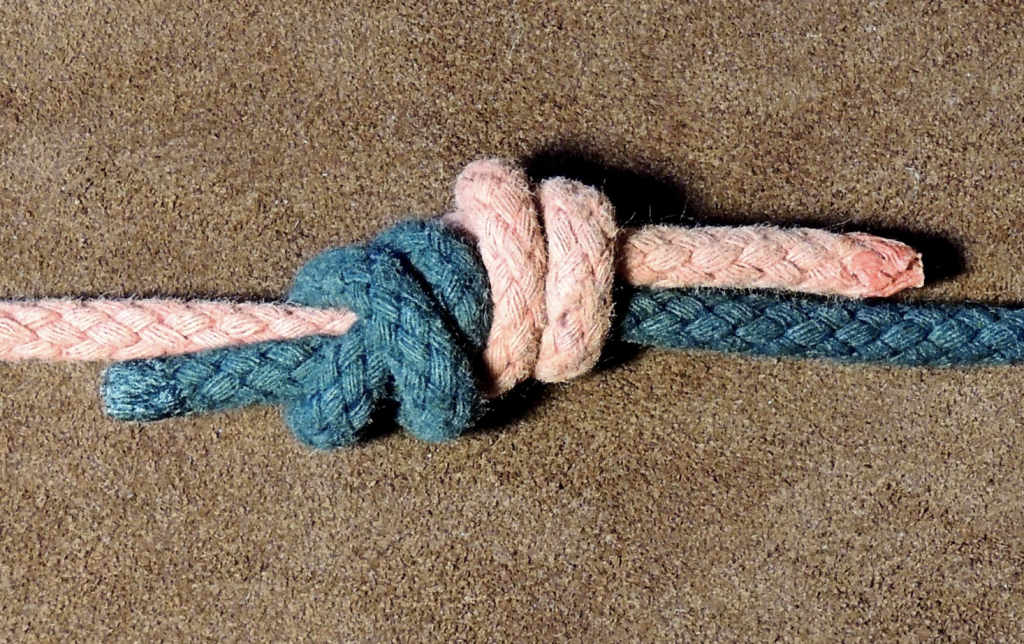
3. The Double Fisherman’s Knot
This Knot is one of the most secure and reliable ways to join two ropes in a permanent loop, and untying it after it gets tightened is quite a challenge. The Double Fisherman’s knot just as its name suggests consists of two fisherman knots tied together. Tying a Double Fisherman’s knot is as follows.
- The first step involves bringing both ends of the rope together and overlapping them.
- Next, hold one end of the rope with your fist with the thumbs over it.
- The next step consists of wrapping the working part of the rope over the thumbs and the first rope, and then bringing it under, and then wrapping it over again to make an X.
- Slide your thumbs out, and then put the rope through the X that has been formed, and then pull it tightly.
- You will be able to see an X and two strands running parallel on the opposite side, while the other end of the rope is inside the knot.
- The other end of the rope should then be pulled, and the process repeated, after which the rope that is pulled will be the working end.
- Now you will have to form another X with your thumb, and then push the rope’s end through the X.
- You will then be left with two knots that have two strands between them. Now pull the knots tightly, and then pull the outer ropes which will bring both knots together.
- In the end, you will be left with a Double Fisherman’s knot, which will have two X and four parallel strands.
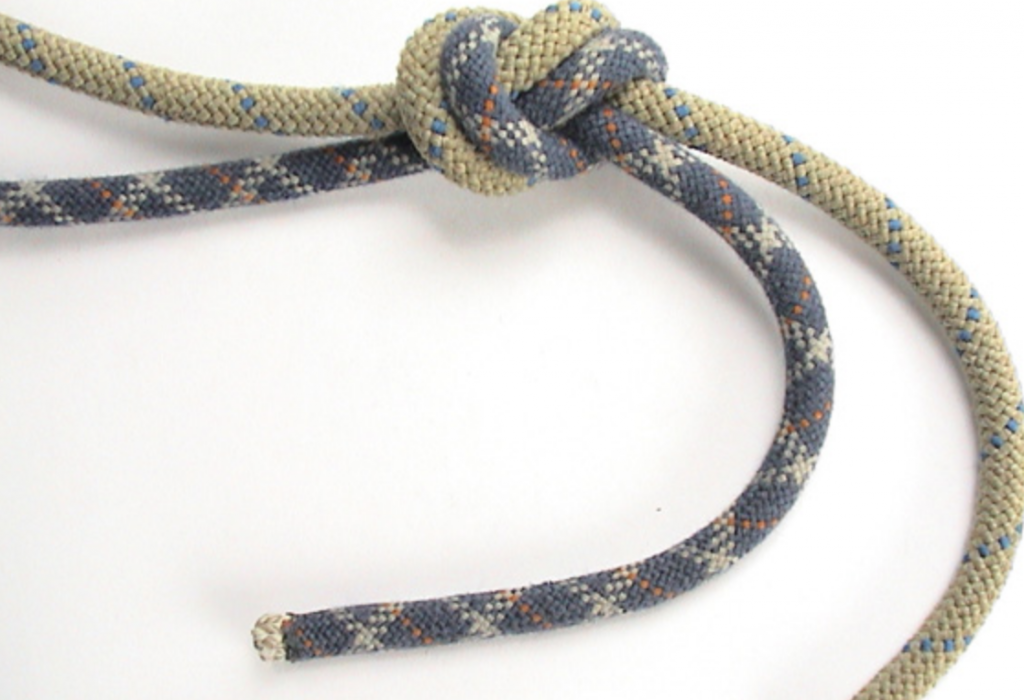
4. The European Death Knot
The European Death Knot is a popular knot used by many climbers for tying two ropes together. Also known as flat overhand bent, this knot is robust, simple and flattens out under load, thus reducing chances of it getting stuck. This knot is most commonly used when rappelling. The instruction for this knot is given below.
- The first step is to bring both ends of the rope together and then tie an overhead knot with both the strands.
- See to it that both the ropes run in a parallel manner throughout the overhead knot.
- The final step is dressing and tightening the knot, by pulling all the four strands individually. It is recommended to have at least 18 inches of tail left to ensure safety.
The above-mentioned knots and hitches are some of the most fundamental ones which a climber should be aware of. They will help a beginner climber to become accustomed to the world of climbing. For Beginners, it is highly recommended to take the help of a trained professional or a seasoned veteran before undertaking a climb.
Call To Action
Make sure to learn these knots, thanks for reading and check out my other article on finding good places to climb outside.