
Table of Contents
This article has an amazon affiliate link. If you buy the board from amazon via the link i get a small fee – the product costs the same for you, but Amazon makes less. It’s a fair way to help me run this site and get some server money.
This one I wanted to write about for a long time. I’m going to show you a dirt cheap and easy way to build a do it yourself DIY portable hangboard setup. No carpentry skills needed, it’s so easy anyone can do it. It’s way easier than most manuals guide you will find on the internet, and it will not involve any drastic changes to your house or home. That means this portable hangboard setup works without drilling your apartment walls. And it’s going to cost less than 100$ and will take only 15 minutes. You will only need a screwdriver, although an electric drill makes it easier, and I’ll show you some pictures. I will also explain to you why this way of training is great for people with busy lives and how it can improve your climbing.
My Setup – less than 100$ and easy to build:
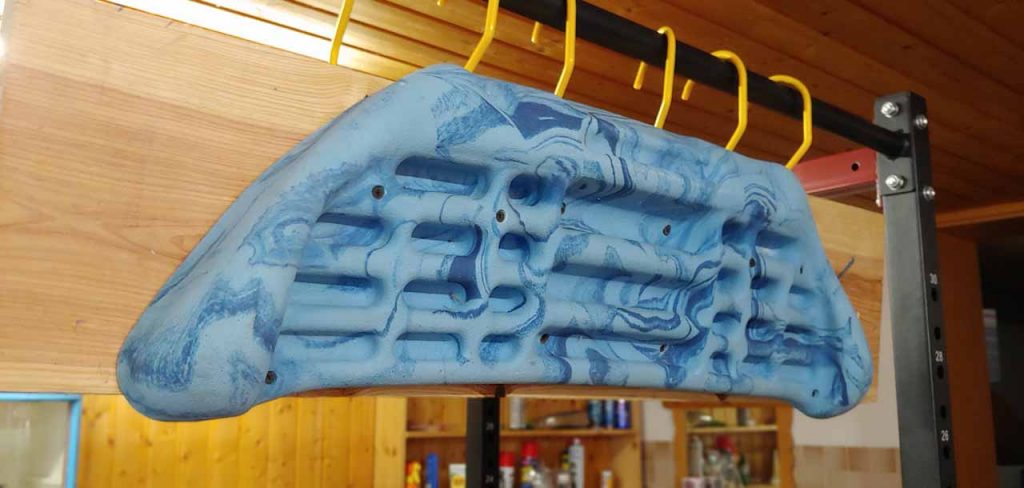
As i get the question again and again: The hangboard i used for this guide is the Metolius Foundry.
It is cheap (50$), works well for beginners and advanced climbers, and doesn’t weigh a lot. You can get it at Amazon for under 55$.
![]()
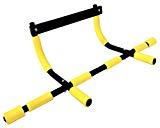
I also use a pullup bar like this: Pullup bar from amazon. It costs under 50$.
Busy live = less time for climbing outside
Climbing in the gym or outside is great. I try to spend as much time outside or there as possible. But sometimes I just don’t have time to drive to the gym and where I live it rains a lot too. If I just want to work on my grip strength and finger technique, I use my own portable trainingboard construction.
Why quick campus board training is great
I’m pretty busy and having a family and wife means I usually have not a lot of free time during the week to train. I found that being able to squeeze in 5 to 10 minutes of finger training and grip exercises for climbing is a great way to maintain an OK level of fitness and if you do it continually you will Improve greatly. Don’t trust me? Let me explain and do some math: If you’re a regular climber and go climbing 2 times a week, climbing 10 routes per session with each session having maybe 3 painful holds and moves you get 2x10x3 = 60 moves that actually push you in the sense of training.
You get stronger by progressive overload, and this is the same for climbing and grip strength and power moves too. Let’s say each move takes around 1 to 2 seconds, then this makes for about 2 minutes of “hard moves training time” per week. But with two climbing sessions, your total time is probably at least 4 hours.
Hangboard or campus board training
With hangboard training, ff you squeeze in 5 minutes warmup and 3 minutes of hard moves on the campus board 4 times a week, then this takes around half an hour each week and yields you 12 minutes of hard training time. That’s a good ratio, and granted you don’t get the outdoor sensation and friendship and leg and technical training but even without, it’s still a damn good amount of workout to keep you fit, and you can do it between dinner and TV at your own schedule at home. A portable hangboard also gives you flexibility as you can move it around in your house and it’s cheap. Win-win!
My setup: Quick, easy and self made
Of you follow my portable hangboard setup, this training device will cost you less than 100 bucks one-time investment. You can even take it with you on business trips if you drive per car. That’s a definite win in my book. When I bought the campus board, I was kind of hesitant – drilling holes in my dry wood walls didn’t excite me. But then I came up with a different solution. It’s a simple construction made from a campus board, a piece of wood, 4 hanger screws. That way don’t need to start messing around with wood cutting etc., this construction works between your door frames, and you won’t even need to drill holes in the wall. The trick: We’re gonna use a pull-up bar. You can order them on Amazon or any fitness shop.
The hack: Just mount your favorite fingerboard to a wooden plate and hang it to a pull up bar
A simple 2×8 and some screws won’t cost you a lot, and it does not even take a long time to assemble it. It’s perfect to build on a rainy afternoon and will give you hours of fun and improved grip for years. The idea is cheap and simple: You mount your favorite campus board to a wooden foundation. Then you use four large handle screws and drill them into the top of the wooden board. Now you can hang this construction to a pulldown bar – or any kind of handle that’s sturdy enough to hold your weight.
Voila done. No need to invest money in a climbing wall, etc., as long as you can live with the fact that your feet are swinging free when you practice. But for me, it wasn’t a problem – I wanted to train grip strength and not feet strength when I use this kind of portable hangboard setup.
The good part: this setup still gives you all the benefits of campus training
Lots of people focus on campus too much or dismiss it altogether. But if you use it right its a super powerful way to develop grip strength like crazy. And you can still practice technique and leg work in the gym or on real rock. Campus boards are such a big thing and have lots of tradition that most gyms have some sort of them installed. There are some caveats, though…
Don’t go too crazy too fast
As with everything climbing and bouldering related you don’t want to overdo it. Five to ten minutes a day are more than enough to stay fit and. That way, the board training supports your other training regime and will improve finger and forearm strength. It can give you power for difficult moves and endurance to stay calm when you’re in uncomfortable holding positions.
When to start with finger training
Don’t start until you have at least a year of climbing experience, because your ligaments and tendons should be adapted to regular climbing. If you have finger injuries, you should also let them heal up entirely and take it easy too. You should also train until you feel your shoulder is taking on too much work, in that case, your fingers are exhausted, and you should pause training to rest. I will probably write another guide about campus board training soon!
Where to hang the board
Wherever you want. I like to have my portable hangboard mine in the basement but thanks to the pull-up bar you can move it wherever you have door frames. Think about chalk though, you might not want it in your living room if you don’t like chalky furniture. You should also pick a door with enough height, so you don’t touch the ground. Room clearance is usually not a problem because the door itself needs room in front of and behind so your goos too go here.
How to build this setup
You can build this setup with any Hangboard, but i do love THIS board. It’s nice on your skin, cheap and has holds for any level of strength, i can only recommend it!
- Wooden 2×8 board
- Screws for wood
- 6 Hangers with screw
- A trainingboard (Metolius for example)
- A pull-up bar for your doorframe
How to build it
- Buy a cheap training board made from polymer or wood, like Metolius brand or similar
- Buy a 2×8 wooden board, cut, so it’s length is slightly wider than your doorframe
- Buy a cheap doorframe pull-up bar
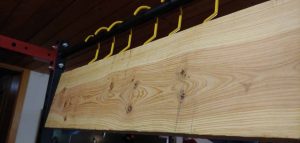
- Get 6 screw-in hangers
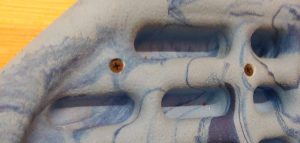
- Place the screw in hooks on top of the 2×8 board like shown in the picture, drill holes slightly smaller than the diameter of the screw and then screw the hangers into the wooden board
- Use screws that came with training board and attached it to the 2×8
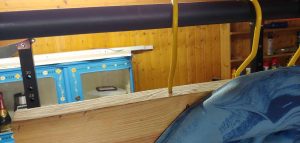
- Hang pull-up bar into the doorframe
- Hang your new training device from the handle of the pull-up bar. The wooden board is slightly wider than the doorframe, and this stabilizes the campus board from swinging
Note: The pull-up bar can withstand your weight easily.
Conclusion
Hope you like this idea, and I’m sure your own portable hangboard will work as good for you as it did for me.
I enjoy using it and can only recommend this setup.
For more hacks like this, climbing training and tips, make sure to subscribe for my newsletters – I promise no spam!
Brilliant!!! I’ve been trying to come up with a way to do this, thanks!
Thank you man, I’m actually working on some improvements as well, might do another post about it sometime! 🙂
Thank you for sharing !
I’d love one in my apartment as I can’t drill into the walls etc as I’m renting
Are you in Australia? Would u be able to send me more close up pictures of the set up please?
I don’t do any finger board training just climb but I plan to get a pull up bar soon !
Hi Julie, thanks for the kind words.
I am actually in Germany now, but i love the group on facebook as people from Australia are very friendly.
I will make a little video about it soon and make sure to put some more photos to this guide!