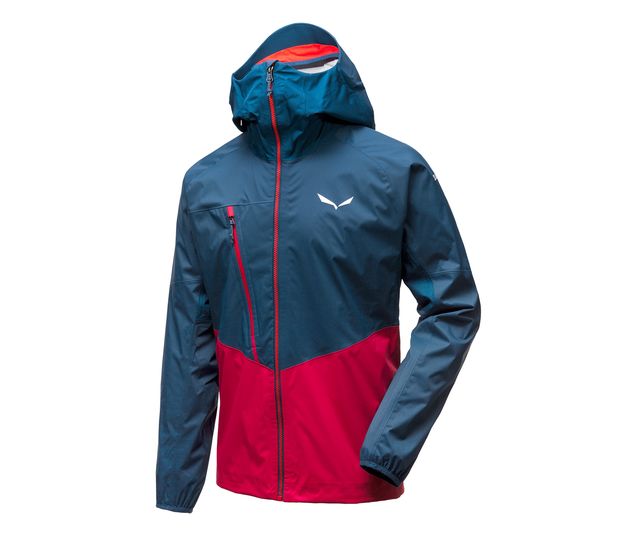
Is it allowed to bring a climbing rope bag on a plane, maybe even as a carry-on item? Since I want to go on a trip overseas and want to bring my climbing gear, I was thinking of carrying my rope inside a backpack. Along with a laptop and other stuff. With all the weird regulations regarding carry-on items, I was not sure if this is actually allowed. And I did some research on Reddit and some climbing forums.
Can You Bring Climbing Rope as Carry-On Luggage in an Airplane? Yes, you can. According to current TSA regulations in 2019, climbing rope and carabiners as well as quickdraw slings and chalk can be carried along on a plane.
Climbing Rope Is Allowed as Carry-On Gear in Airplanes
There is no TSA regulation against climbing rope! You can bring as many feet of rope as you want. Some other climbing gears. TSA regulations usually only forbid items that can be used as weapons. Or somehow can be used to damage the airplane or passengers. A rope is just not dangerous, and there is not much else you can do with it. Except trying to tie someone down – which is unlikely and won’t put the airplane’s safety in jeopardy. It doesn’t matter that the climbing rope is a bit unusual as a carry-on. Sure it will earn you some weird looks from the TSA personnel and maybe even the cabin crew, but that’s not a dealbreaker, right? If you want, go ahead and check the TSAs exact rules, you can find them here.
I once traveled with an oversized hiking backpack and a skateboard as carry-on, and while the cabin crew had a good laugh, there are no regulations or restrictions against this. So go ahead, pack your rope into your cabin bag, it’s allowed, and you’re good to go!
What other gear can you bring on a plane as cabin luggage or carry on?
When we talk about allowed gear as carry on, let’s have a look at some other climbing gear. Climbing rope is okay, as I explained above. But what about other things like crampons, carabiners, chalk and maybe even crash pads? Well, let’s go through the list:
Chalk
Chalk is one of these funny items: It’s perfectly allowed to bring on a plane, but it’s dusty, and usually, I have it in a Ziploc bag. There is no law against it, but make sure to bring the time when you go security: A Ziploc bag full of white powder WILL draw attention to your backpack that you might not want ;-).
Be prepared to do some explaining, but know that you are not doing anything wrong. TSA will be suspicious, but ultimately, they will let you pass as there is no rule against chalk.
Crash Pad / Bouldering Mat as Carry-On or Baggage
Like I said before, if you carry oversized or heavy stuff with you on a plane, costs quickly pile up higher than you can count. A bouldering mat can easily cost you 300$ to carry it two ways, and for that money, it’s usually smarter to buy a bouldering mat or crash pad at your destination, and then sell it when you’re going home.
Example: Buy a decent pad in the shop for 300$, use it for two weeks, sell it for 240$, which is a very fair price for an almost new bouldering pad. That way, two weeks of bouldering with a brand new pad cost you $60, vs. $300 when you bring your own pad from home. That’s a 5x difference, and well worth the hassle to buy a pad and then sell it again if you ask me. You can easily sell a used pad in most climbing stores that sell used gear!
Quickdraws and Carabiners, Nuts, Belay Devices as Carry-On
Hardware that is not sharp, like belaying devices or nuts and cams, but also quickdraws, are allowed as a carry-on and also in your checked baggage. However, keep in mind, most TSA personnel doesn’t know anything about rock climbing or mountaineering and expect them to be suspicious and give you an extra pad down.
As soon as they don’t know an item, they will single you out and give you some extra “love,” after all it’s their job to be suspicious!
All these items are fine to carry inside your cabin luggage or checked baggage. Most airlines will even allow you to stow these items in the overhead compartments. You’re free to bring as many shoes and harnesses etc. as you want, but keep in mind that you have a maximum capacity for cabin luggage. Weight and size are limited to most around 10 kg (22 pounds) and the size of a small suitcase or backpack.
Personal Protection like Helmets
Helmets are no problem. You can even wear them when you board the plane, that way you save weight in your luggage – sure it looks funny, but there is no rule against it!
What climbing or mountaineering gear is not allowed as carry-on in an airplane?
So, all the stuff above is unproblematic, if not a bit heavy to bring as carry on or baggage in a plane. But some items for rock climbers and mountaineers can be a problem. Sharp tools usually are a bad idea to bring as carry on.
White Gas, Stoves, Propane Gas and Fuel Canisters
If you want to bring a stove, you need to bring one that separates the fuel from the stove. You can bring a cleaned and non-smelling stove with you, but you are not allowed to pack propane gas or white gas canisters. Neither in your checked baggage and not in your cabin luggage. So make sure to check that your destination has stores that sell fuel for your stove if you bring it!
Ice-Climbing Hardware
Be careful with ice climbing gear. Things like screws, crampons, and other tools often have very sharp edges and are made from steel or metal, which means they need to be checked as luggage. You cannot bring these things with you as carry-on gear! But they are allowed in checked baggage, which means you might need to pay extra for this bag. The extra amount varies from airline to airline, but you can usually assume to pay somewhere between $25 and $50 per checked bag. Bags that are heavier than 50 pounds (or ca 25 kg) will usually cost even more, expect to pay around $100 each way
Cooking Knives, Knives, Axes, Saws
If you plan to spend time outdoors, and you bring knives and an ax with you, you need to check these items. It’s not allowed to carry them inside your cabin luggage, and when you go through security, you will either need to throw them in the trash or have them confiscated!
Pro Tip: If you forgot about your knife and security wants to confiscate it, tell them you need to store it somewhere. Most airports have lockers for these situations. You can rent them, pay a little fee of around $10 to $20 and retrieve the item when you come home. Better than throwing your beloved Kershaw Knife into the bin!
5 Tips to Make Life Easier When Traveling With Climbing Gear on an Airplane
Here are some handy tips to make your life easier when you travel with rock climbing gear.
Find out Rules of the Airport
Airports have their own rules, and while there might not be TSA regulations against an item, some airports may have extra strict rules. Especially when you fly overseas, it might be smart to inform before you go! A security officer in India might not be really keen to hear why you think you should be allowed to carry gear. Even if it’s according to TSA regulations in the U.S:!
Be Polite and Calm
Always be polite and calm. Don’t get angry with nosy TSA officers; they’re just doing their jobs. Sure they might seem annoying and sometimes even harsh. But if they give you a hard time, try to be the better person, defuse the situation and ask to talk to their supervisor! TSA rules are standardized, so there is not much room for scrutiny and arbitrariness!
Explain the TSA That You Are a Climber and Show Them Your Gear Upfront
If you want to save some time, just put all the climbing stuff in an extra tray when you go through the scanner. Then tell the TSA officers upfront about it: You’re a climber and on your way to a climbing destination, and this is your gear. It might save you some time!
Wear Your Jacket, Helmets and Even the Rope to Save Weight in Your Bag
If you have a lot of baggage, wear your rope around your shoulder, and maybe the helmet while you go through security. You might look funny, but it can save you from paying extra money for overweight luggage! And there is no rule against carrying a rope around your shoulder.
Buy Some Gear at Your Destination
If you have very heavy gear that you need to bring or fuel, consider buying it at the destination. It might be cheaper than bringing it. Especially consumable products like fuel, you cannot bring them anyways due to regulations!. You can also buy things like a crash pad, use it for two weeks and then sell it for a high fraction of the original price!
Conclusion
I hope this post was informative and helps you when you fly to your next climbing or bouldering destination. Know what you can or cannot bring on a plane!
If you want some more gear recommendations for your next trip, check out some of our gear recommendations and reviews:
Regular training is important when training for bouldering or climbing. A lot of people are not really sure if they should do some dedicated finger strength training, and I’ve been in the same situation. In the end, I decided to postpone dedicated fingerboard training for a while, but I also think it’s a good idea to write about my experience and how I came to a conclusion.
So, when should you start with fingerboard training? Short answer: When you stop to improve steadily by just climbing, then you can begin to work on more finger strength. This is usually after 1-2 years of regular climbing training. As a novice climber, finger strength exercises will not do you a big favor, as you are improving quite fast anyway. The incurred risk of injuring your fingers is high, and it’s not worth the risk.
When to Include Fingerboard and Finger Strength Training
Once you stop to progress from regular climbing training, you can think about finger strength training. For most people, this time is after they have been training 1-2 years continuously. Even after this time, there are many people who still improve regularly from simple climbing training without any special focus on finger strength.
The same principle applies to physical fitness: If your general level of fitness is really low, build a foundation first, before you work on climbing-specific fitness.
Only when you’re physically fit and have a climbing routine, think about introducing a finger strength regime – or any sport-specific training for that matter. Once you reach this level, you should be able to climb routes of 6b+ in the lead and spend 2 weeks acquainting with fingerboard training before you start a regular fingerboard training regimen.
And there is a good reason to wait: Hangboarding is incredibly powerful to build finger strength. But it is not climbing-specific training, and climbing includes many more aspects than just finger strength. You need to work on foot and leg technique, body balance, route reading, mental training, and other aspects like grip technique. And anytime you spend in your basement hanging on a board will take time away from actual climbing.
And it’s not just about the time spent hanging – if you train on a hangboard, your fingers need rest. While they rest and rebuild, you cannot climb. Well, you can, but then you increase the risk of injury BIG TIME. If you are a beginner, chances are high your finger tendons are not used to the stress of climbing, and then hangboard training can even cause injuries.
Finger injuries take longer to heal, and while you heal, there won’t be ANY climbing at all. So given these arguments, I’d say: Wait with fingerboard training until you have been climbing for 2 years. Then include it if you want.
If you’re a beginner in climbing or bouldering, you will improve more than enough from plain and simple climbing and bouldering. You don’t need anything else. Take advantage of other training later on!
Always Include General Fitness Training In Your Climbing and Bouldering Training
In order to become familiar with fingerboard training, you can find some good information and protocols in this guide and on this subreddit.
And if you wonder, some general strength training with barbells and bodyweight exercises is ALWAYS good for climbers of any skill level. Shoulder, hips, knees, and back as well as abdominal muscles, all benefit from training. If you climb regularly, these areas need special focus, and you should train antagonists with extra care. Antagonist’s muscles are opposites, and this means when you train push exercises for a muscle group, you must include a pull exercise for the same muscle group too!
Having a balanced, healthy, and strong body is probably the most important tool you can have to unlock improvements in any climbing or bouldering related activity! It also helps to prevent injuries and health problems in the long run.
Why You Should Make Your Own Training Plan
You can buy a training plan in many places online. There are tons of protocols and premade programs available. But these things are not the key to become a better climber. You are the key, and you need to understand the principles behind these programs.
When you understand the scientific principles, you can use any program, adapt it, and still have the desired outcome. On the other hand, if you don’t understand the principles and blindly follow a program, you might never achieve your goals – because your individual situation might need changes to the program. Lack of understanding makes you blind to these changes needed, and you will just waste time training stuff that is ultimately not bringing you near the goals you had.
So do this: Don’t ask for training plans and programs. Go out, research the training methods and principles and understand WHY they work. Then design your own plan to let you achieve your goals, and post it here as a comment or on Reddit or show them an experienced climber.
Keep these things in mind when you make the plan:
What are your goals? Quantify them, i.e., “Want to climb a 7c route.”
How is your climbing and training history?
What was the hardest redpoint attempt you successfully did?
Start here or with my other article, to find a good program to orient!
How To Mount A Hangboard When It’s Time For Hangboard Training
Simply follow the instructions on the hangboards manual. Most brands come with very good instructions. But you can also follow my other article here, where I explain a very good and cheap setup. The nice thing about my setup: You won’t need to drill any holes in your walls, and the setup is completely portable. You can even throw it in your trunk and bring it with you on business trips!
Should I Climb Everything Statically To Become Stronger Fast?
Most certainly not. While climbing statically, i.e., without dynamic swinging, requires lots of strength and thus trains you to become stronger, it’s not a magic bullet. Yes, holding your body in awkward angles and positions will put the load on different muscles and muscle groups, so you will become stronger in that way.
But it also costs a lot of energy, and if you only climb statically, you will end up burning out on many routes that are easy to climb with a dynamic move at the crux. Fact is: Many bouldering gyms and climbing gyms as well as outside sport climbing routes include dynamic moves today. And you need to be able to climb these moves dynamically, or you will have a hard time finishing these routes.
Dynamic moves are often very energy-saving, and after all, climbing is also about efficiency. A good climber uses as little energy as possible to climb a route, and there’s a good reason for this:
At a certain level, climbing becomes a tactical sport. You need to allocate your body’s resources, which is energy spent, to a problem or route. Ultimately your resources a limited, and if you waste energy on moves, you limit your capability at the end of the climb – there simply won’t be any gas in the tank, so to speak.
If you know how to climb sections dynamically, you can bypass lock-offs and energy exhausting holds, saving the energy for later. In the long run, you want to become a better climber.
Spend time learning to climb both dynamically and statically. If you are unsure whether to climb statically or dynamically, these three steps help you:
When you encounter new sections, try to climb them both statically and dynamically
Take mental note how the sections feel, maybe even log the difference to a notebook
See which way feels better, and then use this method in the future
How to Work On Weaknesses?
If you find yourself having a hard time on a route or bouldering problem, take a break from it. Sit down, take a breath, and reflect:
Be open and honest, which issue caused you to fail? Where you burnt out? Did you have the wrong momentum? Maybe a specific angle, balance, or body position felt weird.
Or maybe you had a mental failure, and you were afraid to commit fully.
Maybe you even-paced or breathed wrong, spent too much time in exhausting energy holds, or didn’t rest when you should have rested.
Talk to friends and others who climbed this route, maybe you are following the wrong beta for your body? Watch how they do it!
Video is a great tool too, have your friends film you.
Write down your troubles in a logbook; it will help you to sort it out for future climbs. For example, you might notice that you have regular problems with overclimbing boulder problems at heights of 20 feet plus. Given that you have solid movement and condition, then this suggests that you have a mental barrier and should work on mental training.
A climbing logbook will help you to work on the right key aspect and weakness!
How To Start With Hangboard Training
There are many good hang boarding introductions, like this article here. This video here is good too:
I also put together the very fundamental exercise here to make it extra easy.
Most important: The Static Deadhang
If you don’t do any other hangboard exercise than this, you are still fine. This is the most useful exercise, and you just grab the hangboard and hang from a hold with straight arms for a fixed duration. Take some rest (1-3 minutes) then repeat. Do 4-6 sets. Finished, you don’t need more than this.
Variations of the Deadhang
You can vary the classic Deadhang with some of these exercises:
One arm hangs
Lock offs at different positions and angles
Pullups on the hangboard
Combine these with each other
Work on These Grip Types When Hangboard Training
Keep this picture in mind when we discuss the exercises later. These are your very basic gripping types. They come with certain advantages and disadvantages.
A: Open Crimp – You open your index finger, and only crimp your middle fingers – Hard to hold, but least injury-prone of all crimps
B: Half Crimp – All the fingers are bent at around a 90-degree angle – Medium power exertion, a good combination for many situations
C: Full Crimp – All your fingers are bent with angles less than 90 degrees, your thumb locks your grip – This grip puts a lot of load on your joints and can cause injuries if you’re not used to it! This grip can hold the most weight, but should not be overused!
Maximum Strength vs. Endurance Hangboard Training
Hangboarding is a form of physical training. As such, all the principles from other strength and energy training systems can be applied to it.
If you want to work on maximum strength, you need short, high-intensity sets of 5-10 second duration.
For strength-endurance, you want to include medium intensity sets of 20-60 seconds.
Endurance, you need very low intensity sets longer than 60 seconds.
When doing long sets, you can break them up into many sets of 5-10 seconds with short rest periods of 3-10 seconds, a principle we call repeater.
If you do very short but heavy hangs, these are called max hangs. What you do will influence what skill you train: Endurance or maximum power.
Some Tips For Hangboard Training Beginners
If you are younger than 16 years, do your bones and joints a favor and wait with hangboard training. If you only climb for less than 2 years and/or climb at a level of less than 5.11 or V4/5 or 6b+, then I recommend against hangboarding!
Stay away from hangboarding if you:
Are younger than 16 years
Climb or boulder less than 2 years
Climb or boulder below 6b+ / 5.11 / V4/5
Climbing is so much more than finger strength at this level, and the increased risk from hangboarding is just too high to outweigh the benefits. Just work on proper route reading, movement automation, and footwork until you reach higher climbing grades.
But if you fulfill the upper requirements, start with a low intensity hangboarding training regiment. That way, your fingers, and tendons can adapt, and you can learn the correct technique. You will also have a chance to see how your body reacts to the hangboard training. Follow these three steps:
Follow a light program for 2 weeks.
If all goes well, switch to a moderate 2x/week consistently for another 4-8 weeks.
Then transition to a more intense program of 3x/week or more frequently!
Some Good Hangboard Training Programs as a Foundation
Like I said above, don’t follow programs blindly. There is no single best hangboard training program. But there are some proven and working methods and programs you can use to orient yourself. Some of these are:
Varies over the season, this is nice for periodization
The most important thing to keep in mind when choosing a hangboard training program:
Finger strength is built over long time periods. There is no way to build finger strength within 2-4 weeks, without risking serious injuries. If you commit to a hangboard training regime, do it for the long term benefits. Otherwise, it won’t do you any good!
Common Terms and Notation For Hangboard Training Programs
There is a common notation found in most training programs. It’s useful to know this notation, and it’s derived from the Eva Lopez program.
{Sets} x {HangTime}({EffortLevel}) {x Reps/Set*} :{SetRest}{/ RepRest*}
How to read this:
Setsmeans the total number of sets
HangTime The duration of each hang in seconds
EffortLevel The difference in seconds between the duration you could have maximally held the hang and the duration you held it for
Reps/Set How often you repeat a motion for a set, if left out, it’s assumed to be one
SetRest The resting period between sets in minutes
RepRest Resting period between reps in seconds
Here are two simple examples with a detailed explanation:
4 x 8"(4) :4'
Perform 4 sets of 8 second hangs with an effort level of 4 (meaning the hangs should have so much weight that you could hold for 12 seconds maximally but only hold 8 seconds) and rest for 4 minutes between sets
This is a maximum strength routine
4 x 10"(2) x 10 :2'/3"
Perform 4 sets of 10 reps of 10-second hangs, with an effort level of 2, and rest 3 seconds between the reps and 2 minutes between the sets
This is a strength endurance routine
Effort level (EL): This is lower when your effort is higher. Makes sense, right? If you hold for 10 seconds and could have held for 11 seconds, which makes an EL of 1, this is way harder than holding for 5 seconds if you could have held 10 seconds (EL of 5)
Knowing this notation will help you to read MOST hangboard training programs available online, even if there are slight changes in the exact descriptions!
When to Add Weight to My Hangboard Training?
Adding weight is a variable with which you control the intensity, or Effort Level (see above for a description of this) of your hangs.
With that in mind, most fingerboard training programs that add weight are using max hangs or repeaters, and the weight is used to achieve the desired effort level.
If you do max hangs, you increase added weight to ensure that you are failing at maybe 15 seconds, then actually hanging for 10 seconds. This provides a buffer of 5 seconds.
When doing repeaters, the added weight is used to make sure that you fail at the final set.
An individual set of hangs should not exceed 10 seconds unless you want to train endurance or strength endurance. If you exceed 10 seconds of hanging duration regularly, you will suffer from a strong arm pump as your forearm muscles will be put under too much tension and occlude. Even when training longer duration endurance hangs, it’s always better to take very short 3-5 second rests between reps to have some blood flow!
If you can hold a hang for 20 seconds, it’s a smart move to change your grip to a worse hold or add some weight to come down to the 10 seconds/rep region!
Keep in mind that the buffer and hang times cited above are just for examples. If you reduce the hang time by increasing added weight, this will increase intensity. But it also increases the risk of hand injuries if you are not used to the weight, so use common sense and don’t overdo it with the additional weight!
Will Hangboard Training let me Climb XY Grade in 6 Months of Time?
It will most certainly not. There are a lot of factors to include that govern how high of a grade you can climb, finger strength being only one variable. Different body types, levels of mental and physical fitness will govern how high of a grade you climb. You will also need good route reading skills and find the right beta to climb a route. All the factors are playing a role, so it’s not really possible to answer a question like that.
But this data here, taken from this good article on Reddit, gives an estimation for an average climber with a good training regimen. Take it as an approximation of what is realistically possible under good but not perfect circumstances for an individual with average to above-average talent.
1-2 months from V0-2
3-4 months from V0-4
4-12 months from V0-6
9-24 months from V0-7
18-42 months from V0-8
30-60 months from V0-9
48-84 months from V0-10
72-120 months from V0-11
The first few grades of development are very fast, as your gains are quite high while you still learn the basics. After that, the gains start to slow. The rate of adaption is obviously influenced by your genetic predisposition to climbing too!
A new climber can reach V6 in one year of training, and might then need another year to reach V8. But she or he will reach a plateau at some point, as the progress becomes slower and slower while nearing his or her potential genetic limit.
A Good Analogy How Fast You Can Progress
If you imagine a race, with 1000 people starting at a line, and the goal is 100 yards away, we should ask: How long does it take for each individual to reach the 100-yard line. 100 yards being, of course, representative of V10 grade climbing.
Now, we could time everyone and then calculate the average time. But actually, we would need to adjust the starting line if we talked about climbing.
Everyone under 20 needs to run 10 yards less, so move up 10 yards
BMI between 18 and 22? Move up another 10 yards
Living in an area with many climbing spots and good climbers? Another 10 yards up, please
Everyone with enough money and a job that allows them to take time off to climb whenever conditions are good? That’s another 10 yards
Everyone with strong tendon insertion points, aka they are strong but won’t need a lot of muscles because of their body geometry moves up 25 yards
Now you have a starting field of people where some start 100 yards away and some only 35 yards. Even if there is not a single unmotivated runner, of course, the people closest to the finish post will be faster. And the ones starting without any advantages will take the longest time on average.
The only way to answer the question for you is actually to go out and try. Best to completely ignore the finish post for a while, focus on a good system for training, and have fun climbing. And try to become a better climber, step by step, grade by grade.
Conclusion: Don’t Rush Into Fingerboard and Hangboard Training and Have a Plan
On average, most people become better at climbing faster when they spend more time climbing. And you can spend more time climbing if you are not injured and have fun at climbing. Relax and take it easy for the first two years; you are less likely to injure your fingers that way.
Once you are a decent climber, think about fingerboard training. But don’t rush into it! Follow a Program or better: Develop your own program with common sense.
Visiting Bavaria, Germany and wondering where in Bavaria you can find climbing and bouldering gyms? This is probably the most comprehensive list of climbing and bouldering gyms in Germany for the Area around Munich and Bavaria. It’s broken down by City. And we included a map to show you where it is exactly, as well as all the info like phone number and websites.
We recently updated the list, but if you know of any new gyms and existing gyms that closed or moved write us a comment or send us an email!
This list still being expanded actively so make sure to check back every once in a while!
When I began to rock climb, I was afraid of heights. I still am to a certain degree, but rock climbing helped me control this fear better than anything else. Before starting rock climbing I actually picked up bouldering in a gym, and this was a nice way to get used to the movement without exposing myself to the height. I did took one or two heavy falls, even inside the gym, when I started out, and still today friends and family keep asking me if bouldering is dangerous or not. After all, you climb up to a height of 10-15 feet and sometimes fall.
Is bouldering dangerous? Yes, both indoor and outdoor bouldering are sports activities with a certain risk of injury. If indoor bouldering is a 4 out of 10 in terms of the amount of risk and danger, outdoor bouldering would probably be a 7 or 8 out of 10.
I put together a table with an overview of the risks of different sports or activities, that can help to judge how dangerous bouldering is. As some sports have a higher risk of severe injuries, it’s divided into two aspects: The risk to sustain light to medium injuries, examples are sprained or broken ankles or twisted joints, and the risk for severe injuries like head injuries, spinal or upper torso trauma and life-threatening injuries. Keep in mind, this is a subjective estimation, but I did my best to take into account all aspects.
Activity
Risk of light or medium injuries (0 low, 10 high)
Risk of severe injuries (0 low, 10 high)
Indoor Bouldering
4
2
Outdoor Bouldering
8
6
Indoor Rock Climbing
3
3
Outdoor Rock Climbing
5
6
American Football
5
3
Mountain Biking
7
7
Motorcycle Riding
5
8
Soccer
4
2
Important: Indoor Bouldering is a lot less dangerous than Outdoor Bouldering
When we talk about how dangerous bouldering is, it’s important to see the difference between indoor and outdoor bouldering. While technically the same sport, with the same goals and techniques involved, outdoor bouldering is A LOT more dangerous.
Ina modern bouldering gym, indoor bouldering is not more dangerous than some other sports activities, with most injuries typical involving sprained or broken ankles or knee injuries. This is because the shock-absorbing mats in most modern gyms are incredibly effective. A fall of 6 to 9 feet on a mat inside a gym is not a big deal in most cases. Even if you land in an awkward position there is a high chance that you won’t injure yourself, they are that good. Take note: This obviously depends on the gym, and how good their gear is, but regulatory standards in most of western Europe and North America are pretty high.
But outdoor bouldering is a different beast: The falls are still low-height, but the impact energies are high because you have no thick shock-absorbing mats outdoors. When you boulder outdoors you usually land on either dirt, rock or grass, and even though boulderers have crash pads, these pads are not even close to the effectiveness of the mats inside a gym. And outdoors, you usually bring one or two of these mats, so depending on the boulder problem there is a high chance that when you fall you are actually missing the pad. And without a pad, every fall outdoors is basically a 6 to 10 feet fall to the ground. If you don’t know how to tuck and roll and fall correctly, there is a VERY high chance of spraining or breaking an ankle or knee injuries. And some boulder problems leave you falling head or torso first, which is even worse. Outdoors you should ALWAYS boulder with someone to spot you.
Is Indoor Bouldering more Dangerous than Outdoor Rock Climbing?
Not at all. From all the climbing related activities, indoor bouldering is the safest and least dangerous. Falling heights are low, and shock absorbant mats are always taking in the main portion of the fall energy. Outdoor rock climbing is more dangerous than indoor bouldering, both in terms of the risk of medium or light injuries and also in terms of the risk of severe injuries.
Is Indoor Bouldering more Dangerous than Indoor Rock Climbing?
The chances to injure yourself lightly are higher when indoor bouldering, as you take falls on a regular base. And while the shock absorbing mats are working great, there is still a chance to sprain an ankle or break something if you fall very unfortunate. At the same time, the risk of light or medium injury in a rock climbing gym, where you are climbing with a rope, are smaller. But given that there are multiple fatal or severe accidents due to belaying errors and broken safety rules in rock climbing gym per year, the chances of severe injuries are higher.
This is because IF you fall in a rock climbing gym, and this fall happens to be combined with an error in the belaying, you typically fall higher than in a bouldering gym, and in contrast to a bouldering gym, there are usually no shock-absorbing mats on the ground. Thankfully, the risks in rock climbing gym are extremely low, as this german study showed (observing half a million visits to indoor rock climbing gyms), and you can mitigate and minimize the risk if you follow the proper belaying techniques.
Most of the logged accidents in the study where a combination of negligence on the belayers behalf and or failure to do partner checks and keeping an eye on each other all the time.
In terms of numbers: On every 1000 hours of climbing in a gym, there were.02 injuries. Which made indoor rock climbing safer than skiing, badminton or surfing – all these had higher rates of injuries. And in the study, most injuries where either minor or moderately severe, with no fatal accidents registered.
Risks Involved when Bouldering
Certain injuries and problems are common for bouldering. Not all of these are caused by falls though, finger injuries and abrasions are actually part of the normal bouldering process!
Head and Neck Injuries
No matter if you boulder indoors or outdoors, you should always try to avoid falling onto your head or neck. Whenever you fall while bouldering, you should try to push yourself away from the wall and keep your feet below you.It takes practice first, so make sure to practice by purposely taking some falls from low heights. Key aspect is: When you know you are about to fall, let go with hands and feet at the same time to avoid tumbling upside down.
Finger Injuries When Bouldering
By far the most common injury when bouldering are finger injuries. And I am not even talking about squeezed fingers on outside boulder rocks. Even the manufactured holds inside a modern gym can lead to novice boulderers squeezing their fingers and getting them caught inside eye bolts and loops. If you take a fall while your finger is stuck, it will break or dislocate.
And joint injuries are one side, the other is skin injuries. Even good climbing sessions will probably lead to some flappers, which are torn calluses on hands an fingers. Read more about how to tread them in my other article, that you can find here. The good thing is your hands will toughen up, and you can treat your hands with climbing hand balm from brands like “Climb On” and tape your skin.
Another typical problem is tendonitis. As a boulderer and also climber you have a lot of force on your tendons, both in fingers and forearms. The stress you pot on the tendons is not just cured like muscle soreness is cured, but takes longer. Tendons need longer than muscles to rest and recover, and also take a longer time to adapt.
Always stretch before you climb, strengthen your hands with some grip exercises, and include some stretching when you are at work or sitting in front of your tv!
Scrapes and Bruises When Bouldering
Scrapes and bruises are pretty common, both if you climb on plastic or on real rock. Small bruises, cuts, and scrapes when you slip off a hold will be super common if you climb regularly. Don’t worry about it, it’s part of the game and not a serious problem.
If you have deeper abrasions and cuts, it’s a smart idea to clean them and sterilize the wound to accelerate the healing process and avoid infection.
Tips and Tricks to Avoid Injuries when Indoor Bouldering
Like we discussed above, bouldering has a fair chance of suffering from sprains, strains and broken bones. Bouldering problems are without a rope and mostly max out at 15 feet inside a gym or around 25 feet outside. Gyms have thick mats, but outside you fall to the ground or a thin pad.
You should learn the proper falling technique. It’s my single best tip for avoiding injury. Most people fall to the ground and go into a superman like squat stance, which leads to the force transferring into their knee joints. The correct technique is to fall to the ground feet first and then tucking and rolling.
You should also downclimb as far as possible on a boulder, it serves two purposes: Avoiding unnecessary falls and also teaches you the important skill of downclimbing, which is overlooked nowadays but can save you some trouble and problems both climbing and bouldering.
Never walk underneath someone bouldering. If they fall and land on your head you can easily injure them or yourself severely. If someone falls on you, chances are high you are going to injure your head and the awkward landing will leave them falling to the ground in an awkward position, possibly breaking a leg or worse.
Also, clear the area beneath your boulder, you don’t want to land on water bottles and backpacks. And, if you can, bring a spotter if you boulder outside!
Related Questions
Is indoor rock climbing or bouldering a good workout?
Bouldering is a great workout. It involves a lot of strength, flexibility and mental training. To some degree, it also trains your cardiovascular system, but the benefits in this regard are less than in other endurance sports. Read more here.
How can I improve my climbing or bouldering?
Go climbing and bouldering at least 2-3 times per week, for a minimum of 30 minutes each session. Work on strength and endurance by including some muscle-building exercises. Follow a regular and controlled training regimen. I have an article about this here.
How many rock climbers die per year?
According to a report from 2017, 38 people died in climbing-related accidents. But this number fluctuates, and most of the fatal accidents happened on outdoor rock climbing routes.
Old ropes are cool. Remember the neon-bright colored ones from the 90s? Some of that old rope served me very good as a top rope, coiled away in a drawer, ready to be picked up whenever I needed a backup. But after the 3rd new rope, you will end up with LOTS of leftovers. Time to find other ways to get rid of it and recycling is the eco-friendly way I would prefer.
Can climbing rope be recycled? Yes, it can be recycled, but not in a normal recycling facility. To recycle old climbing rope, there are multiple rope manufacturers that offer to recycle for free: Sterling, Millet, and PMI. Some even pay you for your old rope if you buy a new one!
Everyone loves getting new climbing ropes. A new rope is a wonderful thing, and especially if your old rope is worn out, it’s probably safer to replace it. There are tons of good climbing rope manufacturers, but what I was wondering the other day as if it’s possible to recycle their ropes. Not everyone wants to keep old rope, and after cutting parts of it for some obligatory uses, I was still left with 100 feet of leftovers. I am by no means an expert in climbing rope manufacturing or recycling, so I did some research, and this is what I found out.
Can climbing rope be recycled in your normal garbage bin?
But what if you don’t want to send the rope into a manufacturer. I was wondering if you could maybe just use the normal recycling methods to recycle it? For most states in the US, the answer is NO; curbside programs will likely not accept nylon rope. But if you live in Europe, Germany, for example, chances are high there are some local recycling plants or programs you can give your old climbing rope to.
Climbing rope is nothing but old nylon fabric. So you can donate your worn-out rope to an organization that uses old fabric to supplies it to artists and schools. Examples are organizations like Materials for the Arts in New York and the Scrap Exchange in Durham, NC. These organizations are always happy to accept old nylon fabric, and the chances are high that you have a local organization close by if you live in a metropolitan area.
What else can I do with my old climbing rope?
If you cannot find an organization that accepts old nylon rope, you can just think about some other ways to use it. Recycling is great, but the general idea is to find good use of old materials. Recycling is one way to find a good use for old climbing rope, but you could also just re-use or upcycle it.
Make your climbing rope last longer
If you want to avoid having to recycle your new climbing rope, then the easiest way is not to buy a new rope. This means you need to find a way to keep your old climbing rope in good working condition longer. An easy way is always to store your rope inside a rope bag, and if you go climbing, but the climbing rope bag beneath it. Nothing destroys a rope faster than a full day at the crag with the rope lying in the dirt, rubbing sand and stones all over it, and stepping on it with your shoes.
You should also be gentle with it when you wash it, preferably washing it with lukewarm water only, and letting it dry in the air. NEVER throw your rope in the dryer – that’s the fast lane to killing the durability of the rope, as nylon does not take the heat of a dryer well. Keep your light outside of the sunlight, too, as this damages it! And read my other article about things to keep away from climbing rope, you can find it here.
Upcycle your old climbing rope instead of recycling
What is upcycling, you might ask. This definition is spot on, and it basically states that you find a new use for something old in a creative way. Upcycling is basically the opposite of cycling down. Cycling down means to convert material and products into raw materials of lesser quality. This is usually done when you recycle something, as you break the nylon apart into small particles and reuse these particles. But upcycling means you create a new product from the old materials that are of higher quality.
Upcycle your old climbing rope: Make a rope rug
What are some good ideas to upcycle old climbing rope? You can weave a rope rug. This video here is a great tutorial:
Can you use an old climbing rope as a tow rope?
It turns out you can. There are multiple reports of people using an old climbing rope as a towing rope. It’s another great idea, you can just take multiple strains, and it will be very strong, strong enough to tow a car. Just run it backward and forwards 4 to 6 times, which will reduce the load on individual strains and minimize stretch. Minimizing stretch is important if you use your old climbing rope as a towing rope, as you don’t want the towed car dangling behind your tow car on 50 feet of elastic cord!
Use the old climbing rope as a super strong dog leash
This might be overkill, but I found that using the old rope like a dog leash works super good. Thanks to the material of the climbing rope, the dog leash has some nice stretch if needed, but is still strong enough even if you have a big and powerful dog. And it’s a great money-saver if you need a long leash for dog training!
Related Questions
What to do with old climbing ropes?
Old climbing rope DIY projects
Rope rug
Dog leash.
Furniture
Beer koozies
Ladder from rope
Chalk Bag
Scratch post for your cat
IF you need some more ideas about what to build with your old climbing rope, check out this other post about 24 great ideas for DIY projects with old climbing rope. Find it here.
How long are climbing ropes good for?
Polyamide (Nylon) fibers, which ropes are made from, break down over time. Replace old climbing rope after 10 years, no matter how rarely you used it. Replace it after 5 years if you used it often!
Can you rappel with a dynamic climbing rope?
Yes, you can. A static rope is easier for rappeling, as it gives you more control, but a dynamic rope works fine too. They have more stretch, and it might take some time to get used too, but they are safe to rappel with. Never try climbing with static rope though, a static rope is not made for situations with high-impact forces like a fall!
Most children have a natural urge to move. They usually climb early: they sit up at chairs or coffee tables before they learn to walk. Later, it continues on trees and climbing frames with zeal and courage. Most children enjoy climbing!
At what age can a child begin with rock climbing or bouldering? For climbing and bouldering, children must be coordinatively able to move hands and feet in a controlled and independent manner. In principle, children can already climb in preschool age. At the age of seven, most children can try climbing. The age is only a guideline. If you go climbing with kids, and bouldering, follow these tips to have more fun and keep your kids active.
Climbing promotes natural development
Climbing is fun for most children. Climbing obstacles motivates children, they like to try out. Courage and the ability to assess risks are promoted. Effort is rewarded with success and one can sometimes also fail, without the world ending.
The skills required for climbing are manifold: strength and coordination are trained, and the perception of space and body becomes better through climbing. The children learn to concentrate and take responsibility. Climbing extends movement repertoire and mobility. In addition, children experience climbing and self-determined action and its consequences directly and immediately.
When climbing, difficult areas can often be resolved with agility and sensitivity, which is less disadvantageous to girls, who usually have less strength than their male counterparts, than other sports. Climbing is inclusive and opens up the freedom to try one another within the framework set by safety rules.
Other requirements include a relatively high degree of self-control, a sufficient attention span and the ability to concentrate, not to be distracted easily. The children must be able to safely follow even more complex instructions. These skills should be brought to children if they want to start with bouldering or climbing.
Climbing with a rope
When climbing on higher walls, a top rope and a safety harness is added. Prerequisite for this form of rock climbing is the ability to concentrate and a sense of responsibility. The children must be able to keep a cool head even in stressful situations and concentrate on their rope partner. Younger children do not have these skills yet. It depends on the level of development of each child when these skills are trained. Belaying should ALWAYS be done by an adult!!
Climbing equipment for children
For climbing in the gym children need sportswear, the rest of the equipment can usually be borrowed in the gym.
Children secure each other in climbing courses right from the start, but they work long with back-up. This means that an adult person with some distance still controls the safety rope. Only if the safety competence is sufficiently developed in the estimation of the trainer, the child will climb without supervision, but still supervised. Experience shows that children from primary school age usually have the necessary conditions. According to the recommendation of the Alpine Club (DAV) can begin with securing under control for about eight years, self-securing without supervision is only possible from 14 years.
When children with a lot of climbing experience take their first steps in the lead and are backed up by much heavier adults, it is important that the belayer master the “soft belay” to avoid hard impacts and a dangerously hard impact on the wall.
Bouldering for beginners, then rock climbing
Children want to play and playfully explore. Playing and enjoying doing things should be the most important thing when climbing and bouldering with small children. As a mother or father, you quickly realize if a toddler is having fun. It may also be that a child has a great desire to boulder on one day, not on another. That’s okay and child-friendly.
For the entry is the bouldering, so climbing up to four meters wall height on soft floor mats. Bouldering lessons for children without parents can be useful from the age of five if the bouldering hall is equipped with child bouldering facilities. From this age, children are usually able to concentrate and follow instructions and rules.
Competitions and performance-oriented climbing for children
Depending on their motivation and abilities, children climb ambitiously or compete in competitions. Already for six- to twelve-year-olds, the national associations of the DAV offer Kids Cups, where children can compete with each other in a playful competitive situation. Others soon pull out with their parents or leisure groups on the rock. Even if children participate in competitions or like to try out how hard they can climb, the playful nature of climbing should always be in the foreground.
Although children rarely overburden themselves and, unlike athletic ambitious adolescents, usually do nothing that causes them pain, it can sometimes be necessary to slow down their urge to move a bit. Children from the age of twelve can certainly do physical strength exercises. However, they should not go to the campus board or fingerboard, and the repeated retention of very small handles should be avoided. Particularly sensitive in children and adolescents are the growth joints of the fingers, the tendon attachments on the bone and the still relatively soft articular cartilage.
Bouldering: Safety Basics
Boulder gyms are not playgrounds, but sports facilities. Races and toys are prohibited in the boulder area as this can lead to serious injuries.
Important: Do not stay under a bouldering person, the jump or fall area must always remain free!
Caution: Many children (and many adults) can not estimate how extensive this area is. As far away as possible from the wall or in the middle between two walls. This rule should be re-discussed with the child each time before entering the boulder mats. Parents must ensure that this rule is adhered to – a breach of duty is a criminally relevant act!
The Boulder is not secured, here is “ridiculed”. The spotter always keeps an eye on the bouldering person and, with his arms raised, stands behind them so that the spotter can stabilize or steer the boulder in a fall so that he lands safely on the mat. The spotter should make sure that there are no objects or persons in the lintel area. You have to explain to children that spotters are the only people allowed to stand behind a boulderer. Who has never “spotted”, it should be shown.
Are there good Bouldering games for children to keep them motivated?
There are various bouldering games that even parents with very little experience in bouldering can play with their children. It makes sense to motivate small children through tasks that they can master well because they are inspired by small success experiences and the excitement and the fun of bouldering remain. It is important that the children know and understand the rules of the boulder. No other bouldering people should be bothered or even endangered by the bouldering games.
Save the animal
This game is perfect for a stuffed animal. Depending on the age and ability of the child, it is placed on an easily accessible grip and the child is allowed to boulder to him and get it. It is important not to overstrain the child and to place the stuffed animal in three meters height. It is sufficient if the child has to make two or three climbing moves to catch it.
Mum or dad should be able to get on well with their hands to their own child if it gets scared and you have to help with climbing. It is not unusual for children to be motivated and carelessly bouldering up to a certain height and then realize that they are more anxious and do not dare to boulder down again. Therefore, the first boulder trains should take place within the easy reach of the parents. It does not always have to go up. You can also let the children traverse left or right.
The cuddly toy can be put upwards, depending on motivation and courage. The child should let the stuffed animal down after reaching down and not climb in the arm because it is so limited and can slip off the handles. A variation is to give the cuddly toy to the child so that it can put the animal itself on a handle. Mum or dad must then boulder to cuddly toy and get it. For this purpose, the stuffed animal should be placed eg in the waistband of the child so that the child has his hands free to boulder.
Hide small toys
If the little ones are braver and want bigger incentives, it’s best to bring small toys that stay well on the handles. These include, for example, Playmobil figures, large puzzle pieces or small toy cars. These are placed on top of the handles. The child can either watch or it has to shut his eyes. This makes the game a little harder because the child first has to search for the items. Then the toys can be taken out of the handles.
Either one object after another is brought or they are all taken out of the handles one after the other, without coming back to the mat. It should be noted that the child does not boulder above or below other children. Here, as already described above, the toys should be carefully dropped down and not thrown, and the children should not climb with an object in their hands. Parents remember best where the cars or figures are because they can often no longer see from below. All toys must be found again and taken!
Bouldering blindfolded
A game that demands a lot of attention from the parents but fun for the kids is bouldering blindfolded. Because seeing is an important part of climbing and bouldering, connected eyes pose a special challenge. Touch and confidence are put to the test.
This game should only be played with children who are familiar with the boulder wall and also feel confident in bouldering with blindfolds. For this, the child’s eyes are hidden. Sleeping goggles or a scarf are good. The parents say the direction and the position of the handles. At the beginning, the children stay close to the ground and traverse. The parents basically scoff at the child in this game. If it’s braver it can boulder uphill too. The child should always remove the blindfold if it feels unwell. It should also be removed to boulder down.
General information about bouldering with children
Ensure safety
Children and parents need to understand that bouldering gyms are not playgrounds but sports facilities. Even Boulder games must take place in a disciplined manner. Running, screaming, flying objects or toys on the mats can cause injury. The items that are used in Boulder games, must always be removed from the mats and handles.
Respect gym rules
Each gym has its own rules. However, always keep in mind to not stand below someone bouldering or climbing. The jump or lintel area must always remain free! Since children can not yet estimate how extensive this area is, they must always be sufficiently far away from the boulder wall. Even in a children’s gym. This important rule should be re-discussed with the child each time before entering the boulder mats. In addition, parents must ensure that their children adhere to this important rule.
Have an alternative program Children usually boulder very much. However, this is not true for all children and not always. Coloring books, puzzles or a small card game in a backpack provide variety and can save the bouldering session. Sometimes even a small meal break helps. If games can not motivate and the mood is bad, it’s best to take a break or stay open for a spontaneous alternative program.
Conclusion
I hope you enjoyed this post, read more here, why climbing and bouldering are great for your kids!
Days get shorter, nights longer, the weather turns cold and wet. It’s autumn time, and this means for many of my friends and me more time inside the bouldering and rock climbing gym. But besides training to become a better climber, indoor rock climbing is actually a good workout if done right.
Is Indoor Rock Climbing a Good Workout? Yes, it is – indoor rock climbing is a good and physically demanding workout for the complete body. Because you need to stay light and flexible to climb, it keeps you young too, while also building muscles. It’s no powerlifting or marathon, but more of an all-round workout. It helps you reduce stress and build muscular and mental stamina and also trains your mind. And indoor rock climbing is a lot safer than outdoor rock climbing for beginners.
Indoor Rock Climbing – Cardio and Strength Building In One Independent from the Weather
No matter if you go climbing indoor or outdoor, rock climbing is always a good workout. Not only will continuously climbing build muscular stamina, but it will also make you stronger. If you climb many routes fast, it’s even a good cardio workout for your heart, and inside a gym you can easily send route after route, shielded from bad weather and cold outside temperatures.
To get yourself up a route you need a lot of strength in your upper body and lower body. It’s actually surprising how much leg strength you need for some climbing routes. As a nice side effect, climbing provides a demanding workout for these muscle groups.
It gets better: Climbing in a gym is also a great way to train muscles you didn’t even know you had before. Like your core and hips and some other more obscure smaller muscles. Indoors you will find all kinds of hard routes with difficult crux sections where you need to twist and bend your body in weird positions. it’s like an extreme yoga session that’s a lot more fun. Rock climbing inside a gym is also nice for this, as it helps you try out new styles of climbing you might not find in your area otherwise. If you need a good training regime and system, read on here, I wrote an article about it.
Muscle Groups That You Train By Climbing – You Can Work Your Complete Body Indoors
There are a variety of muscles involved in climbing. If you try out all kinds of different routes like overhangs, slabs, and cracks, you will ultimately give yourself a complete workout.
Abs
Quads
Lats
Calves
Biceps
Core muscles you never knew you had
Obliques
Traps
Delts
Triceps
As you climb on, you will also work your hand, wrists, and forearms. And while rock climbing won’t let you look bulky like a bodybuilder, if you do it right and maybe support it with some pull-ups it definitely lets you build a good physique if you want.
Rock Climbing Improves Flexibility
I can’t stress this enough. I’ve seen 80-year-old rock climbers that were stronger and more flexible than most young people I know. Rock climbing does exactly that: It makes you strong and flexible at the same time. Something you cannot say about most gym memberships. By training in a rock climbing gym, indoors, you can also directly work on moves and routes that are hard for you. By training these weaknesses, rock climbing effectively increases your range of motion too.
The more flexible you get, the better you become at climbing too. If you need some more tips to prepare for bouldering and climbing, read more here.
An Hour Indoor Rock Climbing Works Off Stress
And compared to outdoor rock climbing, where you usually need at least 2-3 hours of time, including the approach and the drive, rock climbing indoors is a quick activity. Have an hour of time after work? Grab a buddy and hit the rock climbing gym for a fun quick hour-long session. Indoor rock climbing helps to raise norepinephrine levels like outdoor rock climbing will too, and this neurotransmitter helps you release stress.
Rock climbing consists of a unique mix of adrenaline and exhilaration that comes with the actions of climbing, leaping, hanging in the air and the feeling of being high above. This mix is powerful and almost like a natural high.
Even with Indoor Rock Climbing You Train Your Brain
Granted, indoors you need less mental skills to read a route. The colored grips are no challenge in this regard. But navigating routes is still hard sometimes, finding the right sequence of footholds and handholds, and balance. So even indoor rock climbing trains your brains problem-solving skills.
And like it’s brothers bouldering and outdoor rock climbing, indoor rock climbing gives you the same good hand-eye coordination that you need for hard sections.
Rock Climbing In The Gym Lets You Conquer Fear In a Safe Environment
Many of us are limited by our fears. Fear is the biggest challenge that stands between the dreams of most people I know. If you can conquer the fear, you can experience success and live your life fully.
While rock climbing doesn’t directly help you with those, it helps you tackle the fear of falling and the fear of heights. When I started rock climbing, I’d get sweaty palms as soon as I was higher than 9 feet above the ground. Continuously learning and climbing new routes helped me work on this fear, and while I still get sweaty palms from time to time, it definitely got better.
When you go indoor rock climbing, you can work on these fears in a safe way. Climbing gyms are inherently safer than outdoor rock routes, as safety bolts are more frequent and you can climb most routes top route too if you want. That way it helps you build confidence and self-esteem before you try out harder routes outside. Indoor rock climbing is really safe that way and climbing walls are also all kinds of safety tested, read more about them here!
Rock Climbing Fights Chronic diseases like High Blood Pressure and Heart Disease
Most people today know about these diseases. Many diseases like diabetes, high blood pressure, and high cholesterol are inherently connected to a sedentary lifestyle and overweight.
Indoor rock climbing is a great way to enjoy rock climbing even in wintertime when most other people sit lazily in front of their TVs or computers. And as rock climbing has the same physical benefits as other sports, it helps you build endurance and strength and those two fight of illnesses as well
Every Rock Climbing Session Burns Off Calories – No Matter if Indoor or Outdoor
Most people don’t know about it, but if you keep resting times to a minimum rock climbing burns off lots of calories too. Depending on how much time you rest between routes, you burn off between 400 and 900 calories in an hour.
I would say, rock climbing indoors can actually burn off calories easier than outdoors, as you can pick and climb many easier routes fast in a rock climbing gym. That way you can work on endurance and strength while also burning lots of calories if you minimize pause time between routes.
Indoor Rock Climbing is A Ton Of Fun and Keeps you Motivated
Rock climbing indoors might not give you the same view and feel of being outdoors. But it’s still a great feeling to be on top of things, up in the air.
When you reach the top of a route, you still have a birds-eye view of things and that still feels great. You also get the same adrenaline rush when you take a fall or lower or lower really fast and when sending hard routes.
And the pure joy of moving fluidly through a route is the same when climbing indoors. If you know every handhold and every twist of your body, you feel a natural flow. This feeling is powerful and fun to experience. By connecting these good feelings with a sport you can enjoy indoors you create almost like an addiction – to a positive thing of course, which is a great way of keeping at it.
Indoor Rock Climbing Gives you the Same Sense of Accomplishment
Tackle a hard route outside your comfort zone and you test your skill and fears. Accomplish it, and you shifted your physical and mental limitations by a degree. This is the same no matter if you climb indoors or outdoors. A hard route is a hard route, and yes indoors you can climb a bit harder than outdoors as you have better safety and don’t need so much route reading.
But successfully climbing a route is still a win-win and indoors you can do it no matter which weather. That way you keep training the whole year. And when summertime comes you are fit and prepared to climb outdoors! By the way, if you need some good climbing shoes or climbing pants read my other articles: Climbing shoes review for 2020, climbing pants review for 2020.
Related Questions
How many calories do you burn by rock climbing or bouldering?
Rock climbing and bouldering burn between 500 to 900 calories per hour, if you can keep rest to a minimum between climbs. It doesn’t matter if you climb indoors or outdoors and if you go bouldering. If anything, bouldering is harder and might burn a bit more per hour.
Can you lose weight indoor rock climbing?
Building muscle will help burn fat, and indoor rock climbing burns off calories too. So yes it will help you lose some weight, provided that you keep rest at a minimum and don’t just chat your way around the gym. But you need to also have a healthy diet and nutrition to lose weight!
Is indoor rock climbing dangerous?
Not really. Indoor rock climbing is among the safest forms of rock climbing if you begin with top rope indoor rock climbing. The worst thing that can happen when you go indoor top-rope climbing is that you take a fall of a few inches.
Climbing is a sport where you need lots of finger strength. The same goes for bouldering and alpine climbing. No matter what you do exactly, your fingers will usually be sore if you’re new to climbing. There are actually findings that show that climbers fingers and hands actually adapt to the short, intense stress climbing exposes them to. Others claim climbing can lead to early Osteoarthritis, so is climbing badly for your fingers?
No climbing is not bad for your fingers, at least not when done right. Improper technique can lead to injuries, but proper climbing strengthens the tendons in hands and fingers, but over a long period of time. If you’re prone to arthritis, you should take extra care warming up properly and work on your finger flexibility.
Does Climbing Increase Chances to Suffer from Osteoarthritis?
Osteoarthritis comes from wear and tear of joints. As such, it results from improper loads and abnormal stress on the same joints over a long time. This is what happens if you put abnormal loads on your fingers and joints for decades. As of today, there is no clear indication of whether sports activities cause Osteoarthritis or not. In order to find out, studies where undertaken with young climbers. Why young climbers you might ask? If young climbers show Osteoarthritis, that would be a very safe sign that climbing actually can cause Osteoarthritis. The same cannot be said about older climbers, as they can naturally suffer from Osteoarthritis.
Don’t mistake Osteoarthritis with “normal” Arthritis; these two are not exactly the same. Arthritis is usually more severe, and as an inflammatory disease affects the joint capsules first. Osteoarthritis affects the cartilage of the joints first and is usually not so severe. This study compared 27 climbers to non-climbers and found that the answer is likely no, at least for the joints in the hand. The study found out that the climbers had stronger hands, however, and some even thicker bones. Climbing is actually likely to remodel your bones to get stronger to make them more powerful – nice side effect! This study actually found out that non-climbers had a higher chance of Osteoarthritis then climbers, especially on the joints of the thumb finger.
But results are not uniform, this study, written 2 years earlier actually found that climbers were at increased risk, as there were climbers in the study group that had signs of OA and none of the non-climbers had. Another study from 2011 supported these findings, showing that climbers showed signs of osteoarthritis sometimes.
But all of these studies had very small sample sizes and not the best methodology. In my eyes, the study with the best methodology found these results:
The more intensive you traing climbing, the more your body adapts, resulting in broadened joints. Osteoarthritic changes where rare in young climbers.
Is Rock Climbing Bad for Arthritis?
But what if you suffer from arthritis already? Is climbing badly for it? Actually, there are many physiotherapists that recommend climbing when people suffer from arthritis. Climbing is great to improve flexibility in the core and hips. And while arthritis will probably reduce climbing performance, a general regimen of sport and exercises is still good for patients with arthritis. Keeping strong muscles and flexibility is even more important when your maximum range of motion is limited because of arthritis!
Can Rock Climbing Cause Carpal Tunnel?
Carpal tunnel is a condition that causes weakness and numbness. If you ever felt these things in your thumb, index, or middle finger when climbing a longer session, it might affect you as well.
Some people are more prone to carpal tunnel syndrome than others. People that spent most of their time in front of the computer and hack on their keyboard are particularly likely to develop it. Climbers can suffer from it too, as the repetitive pattern of wrist use when climbing increases the chance of developing these problems. Especially when you hold a grip, your wrist flexors are continuously put under stress. When the muscles compress, they can actually compress the nerves, and then you suffer from numbness.
If I’m reading it correctly, it appears to state that climbing does not increase your chances of arthritis. It also states that climbing causes the bones in the fingers to be wider than non-climbers, hypothetically proposed as additional bone deposits due to the rock climbing; not causing any negative side effects, however. Also, it appears that these traits appear in people who boulder a lot and rock climb a lot.
Is Rock Climbing Bad for Your Fingers When you Age? Can You Go Rock When You Are over 50 Without Finger Problems?
Most commonly climbers injure their A2 pulley in the finger. The injuries come in 3 categories from a simple sprain over a more serious sprain to a torn pulley. And the injuries take a long time to recover, especially for climbers of age over 50.
But climbing also strengthens the tendons of the fingers, so if you are careful, and have a disciplined training approach (i have an article about it here), there is a good chance of being in your 60s or 70s and climbing quite well. I actually know a lot of older climbers who are still sending hard routes, are all over 60, and have no problems with finger or hand pain.
Related Questions
How Can I Let My Hands Heal After Rock Climbing?
Skin problems are a typical problem for climbers. If you want to keep your skin in working condition for climbing, there are some easy tips you can follow. They will all help you to climb harder, and more often.
Tip for better skin healing
When to do
Why it’s effective
Wash hands after climbing
After your session
Removing dirt and chalk from scratches and wounds will decrease the chance of infection, and help hands to recover
Putting on Lotion before bed
Immediately before you go to bed
The lotion will recover the natural fatty film of your skin and moisturize it. By applying before you sleep, the lotion has a good chance to be fully effective, and you can use a very thick formula, that would normally interfere with not leaving greasy stains on clothing and work.
File calluses down
Whenever you have time
Calluses can get compressed and actually increase the change of flappers, read more about it here. So better file them down and keep a minimal thin layer of hardened skin.
Try different chalk brands
When training, not on on-sight attempts!
Some chalk is more aggressive on your hands than others, give yourself a chance to find the right one by trying out different brands, and see how your skin reacts.
Minimize hot water exposure of your hands
Whenever you wash hands or dishes
Hot water dries out your skin, read more about it here. Simple turn the water a bit cooler, it will still remove dirt and stains well.
Will Rock Climbing Get You in Shape?
It will get you in better shape than doing nothing. It’s not the Nr.1 sport to burn off calories, but it does burn between 500-900 calories in one hour, depending on how much you rest between routes. It also helps build some muscles in your body and keeps you flexible, although it is no way to build a bodybuilder physique. If you want to get in shape, combine climbing with some dedicated strength training and 1-2 times running per week, and you will be in very good shape quickly!
What Is Finger Tape for Climbing?
Climbing tape or also called finger tape is used to protect the skin and tendons of your fingers to put it simply. If you want to know more about it, I wrote an article about it here.
I know you like to browse some good whippers, I do at least. I put together a top 20 climbing huge whippers from different sources like Instagram, Youtube and Vimeo. When I collected these links, I had two rules:
A) Must include a decent fall or ‘whoops’ moment
B) No serious accidents, i.e. as you can see in some of these clips of huge whippers climbers bang arms or feet, etc., but I tried to not include videos where it was obvious that the person got hurt badly. Some videos probably caused a sprained ankle or bruises and cuts thought. But thats part of climbing and bouldering.
C) The clips are not in order, which means they are not rated by the length of the fall or something like that. Just the order I found them in.
1. Chris Sharmas Epic Whipper
Oldie but goldie!
2. Lead Climbing Whipper at Clear Creek Canyon Wearing a GoPro
Good that this climber had his action cam on, makes for a cool perspective!
This one sucks. Thanks that he didn’t injure himself more, at least he looks okay. Original here.
6. 40+ foot whipper at Escalante on Trad Gear
Wow, this one is high. Thankfully his belayer catched it!
7. Eagle Falls in Upstate New York – Trad Climbing Whipper
This happens when a cam placed does not hold. Probably due to wet conditions. Thanks to the good belayer and a fixed bolt beneath him this ended well! What a fall though…
8. 60+ Foot Whipper on Castleton Tower (trad climbing).
Whether this was intentional or not, this whipper is crazy. The climber must have left some clips out and got tangled in the rope too…
11. Trad Climbing Whipper at Joshua Tree (Route: Heart of Darkness)
If you don’t know it, trad climbing or traditional climbing has no drilled fixed bolts but you lay all the safety gear yourself. Can be dicey when you take a fall! This climber was alright except for some bruises.
12. Nasty Whipper on Wonderbar 10d at the Pub Wall With an Upside Down Flip
Thankfully the climber was OK, because he wore a helmet. But the flip at the end shows you how NOT TO fall.
13. Large Whipper with 10ft+ Fall taken on Johnny B Good at The Gallery in Red River Gorge
Nice flip at at the end!
14. Aid Climbing Fall On the lost Arrow Spire
This is how falling looks like when you do aid climbing. The gear slowly looses its hold until it all of a sudden ends in a good fall. Aid climbing means you use gear to help you ascent a route, if you don’t know already.
15. Slab slipper on Peak Technique, near Bowden, Northumberland, UK
Wow, why not top rope this piece of slab? That’s quite a fall and he was lucky to walk away from it.
16. Big Fall that Almost Lifts the Belayer on Tanuki, Japan
The Belayer is almost as high up as the climber!
17. Matt Reeser falls off Desdichado, a 5.13+ in Eldorado Canyon
Kind of a sideways whipper! He actually sent that route one month before.
18. Ben Griffin Takes a High Fall at The End of Sweatpants in Public (5.13c), Cascade Canyon, Colorado
He actually fell headfirst into the cliff and needed staples to close the wound on his head afterward. But he came back and sent the route later! “I decided to skip the last bolt, which I did many times in practicing the route, but the rope got stuck around my leg and knee pad and was unable to release the rope. It really sucked.” he told Rock and Ice later.
19. Boulder Pad Miss – Sprained Ankle
Thankfully nothing more happened to him. Technically not a climbing whipper, but he is like 25ft+ high so I thought it’s worth to include it!
Most of you including me have bike helmets, and when I started climbing I was wondering if I can wear my Bike Helmet for Climbing? I figured any helmet was better than no helmet at all. Later an experienced rock climber told me that bike and climbing helmets are actually very different and if you interchange them you give up some protection. Makes sense kind of right? But what if you have no climbing helmets? Can you still wear a bike helmet – it’s climbing helmets vs bike helmet, we’re going to do a little comparison.
The short answer: No, you should not use a bike helmet for climbing, as you will give up some protection. But if you have nothing else, a bike helmet is better than nothing. There are some differences between climbing and bike helmets, read on for the details.
Bicycle helmets have a softer shell, where the climbing helmets usually have a very hard shell. Bicycle helmets are also better protected against impacts from the sides, and they usually have ventilation holes. In this post I’m going to answer these questions:
How are safety standards for climbing and cycling helmets compared to each other? Are they comparable?
Is there a tradeoff in protection when you wear a bike helmet for climbing?
Are there situations where a bike helmet can even provide better protection than a climbing helmet?
Bike Helmets – Designed for a Single Ground Impact
Bike Helmets are one-time-use. They are designed for a single ground impact, and they are designed to absorb energy from the impact by crumpling and deformation. This design is needed due to the high amount of energy involved in bike crashes. As a consequence bike helmets are probably the helmets that offer the most protection, aside from actual motorcycle helmets. But after the first crash, they are basically useless.
On the other hand, you have climbing helmets. By design, they should protect you from multiple small impacts like falling rocks, etc. That’s why they cannot absorb the same amount of energy like a bike helmet, but they do provide protection for multiple impacts. And they are not designed for hard impacts on the ground, like bike helmets. The typical scenario in climbing: You get hit by falling rocks during your descent. Most head injuries in climbing are not from falling to the ground on your head but instead getting hit by rocks.
That’s why a bike helmet will not work perfectly for climbing: Imagine an ascent and you take a fall, bang your head against the wall and the bike helmet is broken and deformed. From now on it will lack protection, but your ascent is not done yet, and even if you descent, there might still be more rocks, etc. falling on your head. At this point, a bike helmet will not give you good protection anymore.
Bike Helmets vs Climbing Helmets – Different Standards of Safety for Different Activities
The different scenarios of protection needed are also visible in the standards used to measure the helmets. The standards are very different in which these helmets are tested and rated. Climbing helmets use the EN 12492:2000 standard, where multiple impacts on a helmet are tested. Small weights 5kg are dropped at different angles on the top of the helmet from a falling height of 2 meters. Another 5 kg striker object with flat shape is then hit on the front, side, and rear, and they do penetration tests. In all these tests there is a maximum of 10 kN of force transferred to the helmet, so climbing helmets are not designed to absorb a large impact.
If you fall with a bike, there are typically larger forces involved (think of more than 10 kN), and the amount of force which is actually transferred to the head must be smaller, which is done by using a crumpling design with physical deformation. Let’s have a more detailed look at the standards involved and how they compare.
There are four main standards: Two for biking, one American which is the CPSC standard, and the EN 1078 from Europe, and two for climbing. For climbing, there is the European standard EN 12492, and the UIAA 106 which is international.
Bike Helmets – CPSC and EN 1078
CPSC in Detail
The American standard CPSC, CPSC stands for Consumer Product Safety Commission, tests bike helmets with a 5 kg headform that is dropped from 2 meters onto a flat-shaped anvil. There is another test on a hemispheric anvil and an anvil, that is shaped like a curbstone from 1.2 meters. These tests are all performed on helmets that have been sitting around in ambient temperate, freezing temperatures and hot temperatures. They are also performed when the helmet was underwater for 4 hours. All in all the helmets have to pass 5 impacts: 2 from the flat anvil and the hemispheric and one from the curbstone.
EN 1078 in Detail
The EN standard, EN means European, has impacts tested from only 1.5 meters, one from a flat anvil, one from a curbstone, and the helmets are also conditioned with UV light, temperature, and aging. This test is thus a little less strict than the American standard.
Climbing helmets – EN 12492 and UIAA 106
For climbing helmets, there are two main safety standards: The EN 12492:2000 and the UIAA 106. By the way, all these standards are not really testing a helmets ability to reduce traumatic brain injury. They only test for protection against direct physical impact. But traumatic brain injury due to acceleration forces is a huge problem in bike accidents, and there are helmet systems to protect against these injuries (called MIPS). This article here goes a bit more in detail about these injuries..
EN 12492 in Detail
For this standard, thez place the helmet on a form shaped like a head and hit with a striking mass of 5 kg. There are 3 different impacts tested, side, front and back, with an angle of 60 degrees. After this test, another strike mass drops onto the helmet which sits on the headform from 2 meters, this mass is hemispherically shaped. Then there is a further test where a flat striker hits the helmet from 50cm on the front, back and sides. In contrast to bike helmets, climbing helmets test for penetration too, with a canonical strike mass of 3 kg that drops from 1 meter. And there is a retention system test. In order to pass the tests, no impact is allowed to transmit a force of greater than 10 kN to the headform.
UIAA 106 in Detail
For the UIAA 106 safety standards, all the tests are identical, but the transmitted forces are lower: Only 8 kN of force is allowed to be transferred. Remember, the lower the transferred force to the head, the less injured you are in reality. Low forces mean no damage to your head!
Short Comparison of the Two Standards
When we compare the different standards, we can see that cycling and bike helmets have higher acceleration forces and thus forces of impact. This might not be apparent, as the safety standard tests for bike helmets call for only fixed mass and distances, while the climbing helmet tests are also talking about transmitted force. But we can calculate the forces of the test for the bike helmets: Assuming a 5kg headform that experiences 250g’s in a bike helmet test, the F=ma equation yields: 5.0 kg x 250 g x 9.8 m/s-2/g =~ 12 kN.
And what is also visible is that the American standards are a little stricter than the European standards. Why this is, I don’t know. I suspect that there is a reason behind it, but I don’t know. If you want to be extra safe, go with the American standards.